")
")
")


Welcome, aspiring developers and tech enthusiasts, to a journey that unlocks the potential of modern API development. In this comprehensive guide, we’ll delve into the intricacies of Setting Up a GraphQL API Server in Node.js. Whether you’re a seasoned coder or a curious beginner, this step-by-step exploration will empower you to harness the full capabilities of GraphQL within the Node.js environment.
The GraphQL Advantage
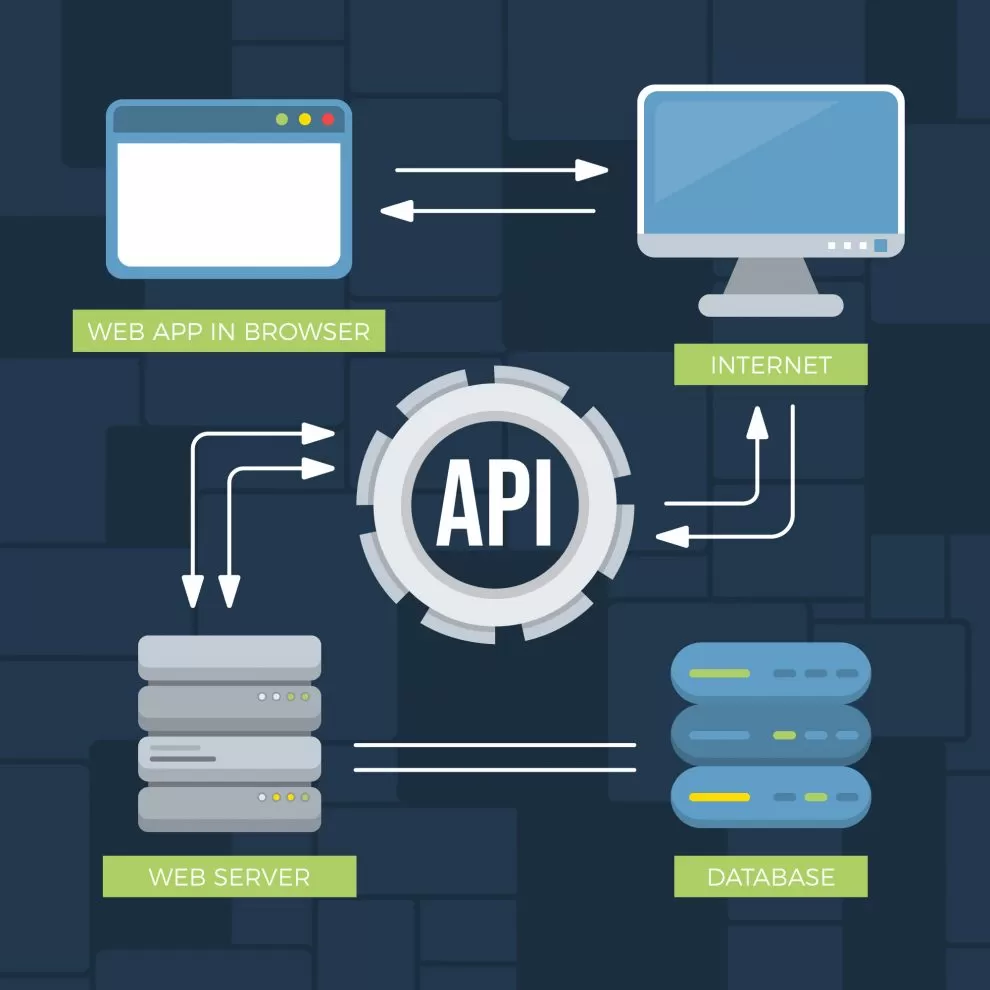
GraphQL, a query language for APIs, has revolutionized how we interact with and consume data. Its flexibility and efficiency have made it a go-to choice for developers aiming to streamline communication between clients and servers. Setting Up a GraphQL API Server in Node.js is not just a technical necessity; it’s a gateway to creating dynamic, responsive, and scalable applications.
Why Node.js?
Node.js, known for its speed and efficiency, aligns seamlessly with the real-time demands of GraphQL. The combination of Node.js and GraphQL offers a potent toolkit for crafting APIs that not only meet but exceed the expectations of modern web development.
Navigating the Guide
Our journey begins with the basics – installing Node.js, initializing your project, and installing essential packages. We’ll guide you through crafting your GraphQL schema, setting up the Express server, and testing your API. But that’s just the starting point.
As we progress, we’ll explore advanced strategies to enhance your GraphQL server. Middleware integration, database connectivity, and real-time communication via WebSocket will elevate your API to new heights. Additionally, we’ll touch on securing your API through authentication and authorization mechanisms, ensuring that your data remains in safe hands.
And what’s a guide without a destination? We’ll wrap up with insights into deploying your GraphQL server, making your creation accessible to the world. Whether you choose Heroku, AWS, or another platform, we’ll equip you with the knowledge to confidently launch your GraphQL API into the digital realm.
So, fasten your seatbelts, fellow developers. The realm of GraphQL awaits, and by the end of this guide, you’ll not only have Set Up a GraphQL API Server in Node.js, but you’ll have gained the expertise to shape it into a powerful tool for your future projects. Let’s embark on this coding adventure together!
Also Read: A Comprehensive Guide to Testing GraphQL APIs
Getting Started with GraphQL in Node.js
Setting Up a GraphQL API Server in Node.js is a crucial step for developers looking to harness the power of GraphQL. Let’s dive in and explore the fundamental steps required to establish your GraphQL server.
Installing Node.js and npm:
Before we can begin Setting Up a GraphQL API Server in Node.js, ensure that Node.js and npm are installed on your machine. You can download the latest version from the official Node.js website and follow the installation instructions.
Initializing Your Node.js Project:
Once Node.js and npm are set up, navigate to your project directory in the terminal and run the command:
npm init -yThis command initializes a package.json file with default values, laying the groundwork for your GraphQL server.
Installing GraphQL Packages:
To start Setting Up a GraphQL API Server in Node.js, you need to install the necessary packages. Run the following command:
npm install express express-graphql graphqlThese packages include Express, a popular Node.js web application framework, and GraphQL for handling GraphQL queries.
Creating the GraphQL Schema:
Now, it’s time to define your GraphQL schema. Open your project in your preferred code editor and create a file namedschema.js. Here’s a basic example:
const { GraphQLObjectType, GraphQLSchema, GraphQLString } = require('graphql');

const RootQuery = new GraphQLObjectType({
  name: 'RootQueryType',
  fields: {
    hello: {
      type: GraphQLString,
      resolve() {
        return 'Setting Up a GraphQL API Server in Node.js';
      },
    },
  },
});

module.exports = new GraphQLSchema({
  query: RootQuery,
});
This simple schema defines a single query named ‘hello’ that returns our keyphrase.
Setting Up the Express Server:
Now, let’s create the Express server. In your main project file (e.g.,index.js), add the following code:
const express = require('express');
const { graphqlHTTP } = require('express-graphql');
const schema = require('./schema');

const app = express();

app.use(
  '/graphql',
  graphqlHTTP({
    schema,
    graphiql: true,
  })
);

const PORT = process.env.PORT || 3000;

app.listen(PORT, () => {
  console.log(`Server running on port ${PORT}`);
});
This code sets up an Express server with a GraphQL endpoint and enables the GraphiQL interface for testing your queries.
Testing Your GraphQL Server:
With everything in place, it’s time to test your GraphQL server. Start the server by running:
node index.jsVisit http://localhost:3000/graphql in your browser and execute the ‘hello’ query. You should see the keyphrase “Setting Up a GraphQL API Server in Node.js” as the response.
Enhancing Your GraphQL API
Now that you’ve mastered the basics of Setting Up a GraphQL API Server in Node.js, it’s time to explore ways to enhance its functionality. Let’s look at a few strategies to take your GraphQL server to the next level.
Middleware Integration:
Integrating middleware into your Express server can add additional functionality to your GraphQL API. Consider incorporating popular middleware likebody-parserfor parsing incoming requests andcorsfor handling cross-origin resource sharing.
npm install body-parser cors Update your index.js file to include these middleware:
const bodyParser = require('body-parser');
const cors = require('cors');

app.use(bodyParser.json());
app.use(cors());
Database Integration
To make your GraphQL server more practical, integrate it with a database. MongoDB, MySQL, or PostgreSQL are popular choices. Use an Object-Relational Mapping (ORM) library like Mongoose or Sequelize to simplify database interactions.
Authentication and Authorization
Securing your GraphQL API is paramount. Implement user authentication and authorization mechanisms to control access to certain queries or mutations. Popular libraries like Passport.js can help with authentication strategies.
Real-time Data with WebSocket
For real-time functionality, consider integrating WebSocket support. The subscriptions-transport-ws package allows you to implement GraphQL subscriptions, enabling real-time communication between the server and clients.
npm install subscriptions-transport-wsUpdate your server code to include WebSocket support:
const { createServer } = require('http');
const { SubscriptionServer } = require('subscriptions-transport-ws');

const server = createServer(app);

server.listen(PORT, () => {
  console.log(`Server running on port ${PORT}`);

  new SubscriptionServer({
    execute,
    subscribe,
    schema,
  }, {
    server,
    path: '/subscriptions',
  });
});
Deploying Your GraphQL Server
Once you’ve fine-tuned your GraphQL API server, it’s time to deploy it for the world to access. Platforms like Heroku, AWS, or Azure offer convenient solutions for deploying Node.js applications. Ensure to update your package.json with a start script pointing to your main server file.
"scripts": {
  "start": "node index.js"
}
Also Read: Why Should You Choose Laravel for Shopify App Development?
Crafting Your GraphQL Schema
Defining Your Schema
As you dive into Setting Up a GraphQL API Server in Node.js, creating a robust schema is paramount. Your schema serves as the contract between the client and server, defining the data types, queries, and mutations available.
const { GraphQLObjectType, GraphQLSchema, GraphQLString } = require('graphql');

const RootQuery = new GraphQLObjectType({
  name: 'RootQueryType',
  fields: {
    hello: {
      type: GraphQLString,
      resolve() {
        return 'Setting Up a GraphQL API Server in Node.js';
      },
    },
  },
});

module.exports = new GraphQLSchema({
  query: RootQuery,
});
Building the Express Server
Integrating Express
With your schema in place, Setting Up a GraphQL API Server in Node.js involves integrating Express. Create your server file (e.g., index.js) and set up the Express server to handle GraphQL queries.
const express = require('express');
const { graphqlHTTP } = require('express-graphql');
const schema = require('./schema');

const app = express();

app.use(
  '/graphql',
  graphqlHTTP({
    schema,
    graphiql: true,
  })
);

const PORT = process.env.PORT || 3000;

app.listen(PORT, () => {
  console.log(`Server running on port ${PORT}`);
});
Conclusion
In conclusion, our journey through Setting Up a GraphQL API Server in Node.js has been both enlightening and empowering. By choosing the dynamic duo of GraphQL and Node.js, you’ve entered a realm where efficiency and flexibility reign supreme. The foundational steps, from initializing the project to crafting a robust GraphQL schema, have set the stage for a powerful API that responds precisely to client needs.
As we delved into more advanced strategies, the integration of middleware, databases, and real-time communication highlighted the scalability and versatility of your GraphQL server. Security measures such as authentication and authorization ensured that your API is not just efficient but also safeguarded against potential threats. Each step in this guide has been a building block, transforming your server into a sophisticated tool ready for real-world applications.
Deploying your GraphQL server is the final stride in this journey, as you make your creation accessible to the global community. Whether your ambitions lead you to Heroku, AWS, or another platform, the deployment process solidifies your status as a developer capable of delivering impactful solutions. Armed with the knowledge gained here, you’re not just Setting Up a GraphQL API Server in Node.js; you’re embracing a development paradigm that harmonizes modern practices with future possibilities. Happy coding, and may your GraphQL journey be filled with innovation and success!